So I honestly don't have much for you today. I got a few to many Christmas sweets in my belly and that has made me a bit on the lazy side.
So instead of writing a big long spiel about something that has to do with sustainable living I will instead direct you to a article on Treehugger. It about a autonomous house built in England that has no furnace for heating and is not connected to any of the grid utilities. It showcases a standard of building that I believe will be so important in years to come as our resources dwindle and our demand increases.
I hope you enjoy it,
Cropthorne Autonomous House
Monday, December 29, 2014
Saturday, December 27, 2014
Where Did Corn Come From?
 Corn is wonder of the modern world. We grow more corn today in American than any other crop. Its uses are diverse, from feeding our cattle to providing the sweetener in our candies It also is one of the main sources of ethanol that we grow in this country.
This history of corn goes back thousands years and all the way to Central America where it was first domesticated. Most historians believe that corn was first domesticated in the Tuehucan Valley of Mexico after interbreeding was done by early farmers of the area. Then through centuries of selective breeding keeping only the best of each season the modern varieties of corn were created.
Corn is not only the most important crop we grow today but it was important in ancient times. Historical evidence shows that corn was grown from North Dakota to Argentina and was found to be in great number of varieties. The diversification was a result of the great distances the plant traveled as it moved with the native groups that lived in the Americas. They continued the domestication process of the plant and adapted it to withstand the climatic conditions of their specific area.
 All of this domestication and breeding of specific traits led to the creation of a great variety of corn that gave us all sorts of wonderful flavors and interesting looks.
But alas times have changed for corn and the all the wonderful varieties have gone to the wayside in favor of high yielding, flavorless genetically stale specimens. The problem with the corn we are growing today is that it is wholly dependent on a fossil fuel based agricultural system. It requires massive inputs of pesticides, and fertilizers to grow which is not a sustainable approach to growing food. If we expect to grow a sustainable future we cannot continue to rely solely on a industrially driven monoculture that can be wiped out by a unexpected disease or insect. We need to grow diverse varieties of crops to fight against unexpected disasters that are potentially in our future. So if you want to build a truly sustainable life you should grow your own food, save seed and eventually develop your own varieties of plants.
Friday, December 26, 2014
Disposing of your Christmas Tree In a Sustainable Way
Like many of you out there I put up a Christmas tree to celebrate the holiday season. But when the holidays are done it is time to dispose of the tree and there enters a conundrum. Some communities offer a eco friendly option for tree disposal in the form of a composting or chipping service that will turn that tree into a useful product for the garden. But in many town across the nation that does not hold true. So if the only obvious option you have left is to send your tree to a landfill sealed up in a plastic bag then its time to consider less obvious options.
With a little thought you can turn the chore of disposing of the Christmas tree into a opportunity to cook good food, enrich your garden, or surprise your family with your artistic side. The choice is yours but if I was you how could I turn down a opportunity to turn some simple wood into a beautiful item.
Firewood
If you have a wood stove, fireplace or grill that you can cook with wood in then the first solution is a easy one. With a simple camp saw you can buck a Christmas tree into usable chunks fairly quickly. I really like this option because I will take my Christmas tree and cut it up and then save that firewood to grill my 4th of July meal over. There is a certain balance to that I really like. The limbs can be saved for excellent kindling as well, once they have had time to dry out.
Compost Material
This option is another great one if you have pile set up or want to create one. Cut branches are excellent for this as they provide a continuous source of carbon to the pile and they add lift to the pile which lets in more air to help the compost along. You could add the trunk sections to the pile as well but the larger the chunks the longer they will take to decompose.Arts and Crafts
I like to take chunks of my tree and turn them into little wood carvings, coasters, trivets for hot pans and things like this. To use a tree for this purpose you would want to the trim the branches off and put it somewhere it can season for awhile. This is crucial as members of the pine and spruce family are prone to cracking if worked before they are properly seasoned.With a little thought you can turn the chore of disposing of the Christmas tree into a opportunity to cook good food, enrich your garden, or surprise your family with your artistic side. The choice is yours but if I was you how could I turn down a opportunity to turn some simple wood into a beautiful item.
Tuesday, December 23, 2014
Heating Your House With Firewood
Despite the fact that heating your house with wood does release CO2 into the atmosphere it does essentially amount to zero emissions when you take into account that there are new trees ready to absorb whatever CO2 is emitted from your chimney. So if you harvest the wood in an ecological responsible manner then then firewood can be a very eco friendly heating material of choice.
There are 3 types of wood heaters that you can have in your home, the fireplace, wood stove and masonry heater/stove. These three technologies all have their strengths and weaknesses and it depends on what your are looking for in a heating system.
If a fire place is still the choice for you then make sure to use seasoned wood that burns cleanly and hot enough to throw a lot of heat. You should also consider a fireplace design called a Rumford Fireplace. These shallow fireplaces with a angled back increases airflow through the fire and out the chimney. The design allows wood to burn much more cleanly and the angled back help reflect heat back out into the room better.
 Some of the first true wood stoves came around in the 18th century and they were immediately noticed to be more energy efficient than traditional fireplaces of the day. There are many permutations of the wood stove but they all operate on the same basic principle.
Today wood stoves are very well engineered and have very high combustion efficiency which helps reduce the amount of fine particles that they produce. The graph to the right shows the relative emissions of standard heating systems and as you can see the certified modern wood stove is vastly better than a fireplace.
They do have some disadvantages when it comes to safety and aesthetics. The outside of the of the stove can become very hot and can easily hurt children or pets. Plus many of them are very utilitarian in design and do not mesh with modern concepts of beauty.
The advent of The Little Ice Age which precipitated a period of a severe and long winters was the primary driver behind the development of the masonry heater. The colder temperatures put pressure on the existing forests and current heating technologies of the day which demanded a better system. What came about was a type of stove with a new design that could reclaim 90% or better of the heat generated by the fire and slowly released the heat into the space over the rest of the day. This design also greatly increase increased burn efficiency of the wood which left very little residue and almost no chimney buildup.
Another perk of this design was the amount of wood that is used. Most masonry heaters when used correctly will only have two quick very hot fires laid in twice a day for all day heating. When compared to wood stoves or fireplaces that have to be fed all day long to maintain heat. The major downside of a masonry stove is the size and the cost to have them built. It will cost into the thousands of dollars for even the smallest one but the money is well worth it for a good masonry stove.
There are 3 types of wood heaters that you can have in your home, the fireplace, wood stove and masonry heater/stove. These three technologies all have their strengths and weaknesses and it depends on what your are looking for in a heating system.
Fireplaces
Fireplaces are beautiful to look at and have been a staple of home heating for thousands of years. The main issue that occurs with fireplaces is that they can be horribly inefficient when compared to wood stove and masonry stoves. They will actually suck warm air from other rooms in the structure and make them cooler while only marginally heating the room they are in.If a fire place is still the choice for you then make sure to use seasoned wood that burns cleanly and hot enough to throw a lot of heat. You should also consider a fireplace design called a Rumford Fireplace. These shallow fireplaces with a angled back increases airflow through the fire and out the chimney. The design allows wood to burn much more cleanly and the angled back help reflect heat back out into the room better.
Wood Stoves
Some of the first true wood stoves came around in the 18th century and they were immediately noticed to be more energy efficient than traditional fireplaces of the day. There are many permutations of the wood stove but they all operate on the same basic principle. Today wood stoves are very well engineered and have very high combustion efficiency which helps reduce the amount of fine particles that they produce. The graph to the right shows the relative emissions of standard heating systems and as you can see the certified modern wood stove is vastly better than a fireplace.
They do have some disadvantages when it comes to safety and aesthetics. The outside of the of the stove can become very hot and can easily hurt children or pets. Plus many of them are very utilitarian in design and do not mesh with modern concepts of beauty.
Masonry Heater
The advent of The Little Ice Age which precipitated a period of a severe and long winters was the primary driver behind the development of the masonry heater. The colder temperatures put pressure on the existing forests and current heating technologies of the day which demanded a better system. What came about was a type of stove with a new design that could reclaim 90% or better of the heat generated by the fire and slowly released the heat into the space over the rest of the day. This design also greatly increase increased burn efficiency of the wood which left very little residue and almost no chimney buildup.
Another perk of this design was the amount of wood that is used. Most masonry heaters when used correctly will only have two quick very hot fires laid in twice a day for all day heating. When compared to wood stoves or fireplaces that have to be fed all day long to maintain heat. The major downside of a masonry stove is the size and the cost to have them built. It will cost into the thousands of dollars for even the smallest one but the money is well worth it for a good masonry stove.
Monday, December 22, 2014
Getting Ready for Spring Planting Today
Getting ready for the garden this coming spring is more about what plan you put into place this winter than it is about tilling the soil and planting the seeds. Getting a solid plan into place can save you a lot of headache in the spring.
The first thing you should do is take a look at notes you should have been taking during the summer. Good notes along with pictures will act as a record of what you had success and failures with. For example I kept a log that I put in planting dates, germination dates, rainfall and production success of plant varieties.
Winter is the perfect time to clean and sanitize your seed starting equipment. Everything from the seed cups, trays, lights and tools used to plant should be sanitized to prevent any transmission of diseases from year to year. Many seed starting manuals recommend heavy washing and solution of bleach but I believe that a good hot water washing and drying should be sufficient.
The first thing you should do is take a look at notes you should have been taking during the summer. Good notes along with pictures will act as a record of what you had success and failures with. For example I kept a log that I put in planting dates, germination dates, rainfall and production success of plant varieties.
Planning The Crop Rotation
You should always try and avoid planting the same species or even family of plants in the same section of the garden year after year. This can lead to disease, pest and weed issues if not properly managed. The modern approach is to spray the whole garden down with disease and insect killing chemicals and not give a crap about the consequences. By using crop rotations you can reduce or eliminate the need for these chemicals and get a healthy garden from it.
Looking at Seed
The first step to looking for good seed to try in your garden is to make sure the plants they grow are compatible with your area. The last thing you want to do it try to grow something that wasn't meant to grow in your area.
The second step is to make sure what you are growing is a heirloom plant that will produce seed that you can plant next year. Many common vegetables and farm crops are hybrids which can grow some great produce this year but will not grow true to the hybrid characteristic next year if you save the seed. By growing only heirloom varieties you can save seed and eventually grown plants that are adapted to your area.
The final item when it comes to looking at seed it to keep it reasonable what you order/buy. You only have so much space in your garden and you shouldn't devote the entire thing to untested varieties of plants. Every year you should always try something new until you get what you feel is the perfect mix for you but even then I still might devote a small part of any garden to new things.
Getting Everything Clean
Winter is the perfect time to clean and sanitize your seed starting equipment. Everything from the seed cups, trays, lights and tools used to plant should be sanitized to prevent any transmission of diseases from year to year. Many seed starting manuals recommend heavy washing and solution of bleach but I believe that a good hot water washing and drying should be sufficient.
Sunday, December 21, 2014
Science of Sustainability- How Do Seeds Germinate?
The ability of seeds to endure harsh conditions and only germinate when the conditions are good is a miracle of the natural world. A seed is essentially life in a pill form that is just waiting to spring into action as soon as it can.
The process by which a seed germinates is a simple one with lots of fancy terms used to described it. To sum it up when a seed is exposed to water at the correct range of temperatures the seed will absorb or drink up water. This water enters the cells in the seed and swells them up with water. At the same time the metabolic activity of the seed starts up and puts a whole sequence of events in play.

First to emerge is the radicle of the plant which develops into the primary tap root of the plant. Then as the seed continues to expand the first shoot and cotyledon comes out the top of the seed. The cotyledon is the structure that contains the first leaves of the plant and this will soon open up and expose them to the sun and air.
Once the cotyledon opens up and the first true leaves are exposed then you have a plant in its true form.
Temperature is also a key factor in germination success. It needs to be warm enough on a consistent basis in the soil for the seeds to get the hint that now is the time to germinate. Temperature can also affect germination in other ways as well. For example some seed types need prolonged exposure to cold temperatures before they will be able to germinate in the spring. Other seeds will need to be soaked or put through a process called scarification which weakens the seed coat enough for water and oxygen to penetrate it.
Stay tuned for more Science of Sustainability topics
The process by which a seed germinates is a simple one with lots of fancy terms used to described it. To sum it up when a seed is exposed to water at the correct range of temperatures the seed will absorb or drink up water. This water enters the cells in the seed and swells them up with water. At the same time the metabolic activity of the seed starts up and puts a whole sequence of events in play.
First to emerge is the radicle of the plant which develops into the primary tap root of the plant. Then as the seed continues to expand the first shoot and cotyledon comes out the top of the seed. The cotyledon is the structure that contains the first leaves of the plant and this will soon open up and expose them to the sun and air.
Once the cotyledon opens up and the first true leaves are exposed then you have a plant in its true form.
What can affect germination?
Germination can be affected by quite a few factors that exist in the natural world. Water is the crucial agent that starts the germination process and as such it is the once that can affect it the most. To much water and you can restrict oxygen from entering the seeds cells as they are growing and this will slow or kill the seed as it germinating. As I am sure you can imagine the opposite is true as well to little water and the see dries up halfway through the germination process.Temperature is also a key factor in germination success. It needs to be warm enough on a consistent basis in the soil for the seeds to get the hint that now is the time to germinate. Temperature can also affect germination in other ways as well. For example some seed types need prolonged exposure to cold temperatures before they will be able to germinate in the spring. Other seeds will need to be soaked or put through a process called scarification which weakens the seed coat enough for water and oxygen to penetrate it.
Stay tuned for more Science of Sustainability topics
Wednesday, December 17, 2014
Science of Sustainability- Long Term Effects of Cultivation.
Cultivation has been a tried and true practice for agriculture since its beginnings. But in recent years we have begun to understand what the long term negative effects it can have on your soil. The negatives are not little ones either and repairing them will take long term changes in how we conduct agriculture. While there are many different consequences to much tillage I am just going to quickly gloss over three of the most common ones.
Soil compaction occurs when soil is compressed under weight from either a machine or animal. Now some compaction is a natural occurrence and it is remedied by natural methods. But when you introduce tillage into the equation it alters the balance between the soil compacting forces and the soil loosening forces. Now if you have ever seen a garden after it is freshly tilled you will notice that the soil is light, fluffy and very loose. This fluffy top layer however covers up what is happening beneath the tilled layer. When an area is under constant tillage you can loosen the top part of the soil but beneath it will be forming a plow pan layer.
A plow pan is a layer of soil that gets super compacted from being constantly run over by heavy machinery or organisms, but is never loosened because it forms beyond the reach of the tillage equipment. While this layer is beyond the reach of tillage equipment it is not beyond the reach of most roots. Plants put roots down deep in search of water and nutrients and when they hit this layer they can't get through it. This cuts them off from things that they need and this can really hurt plant success.
Cultivation is the primary driver behind the loss of soil organic matter. The decay process is hindered in the soil by how much oxygen is available to microorganisms. When the soil is cultivated oxygen floods into the system and stimulates the microorganisms to do what they do and that is break down organic matter. What happens is the rapid consumption of the organic matter which then reduces soil health and also releases CO2 back into the atmosphere. Through continuous cultivation you can destroy even the most fertile of soils and are then forced to supplement the soil with a growing amount of fossil fuels nutrients.
How would you like it if a tornado, wildfire, earthquake, and a flood all hit your house at the same time. It would ruin your day and that is in essence what we do to soil organisms every time we till the soil. So in a traditional industrial agriculture operation that would be twice a year at the minimum. You can imagine that this might effect how successful certain organisms are at surviving. The larger the organism the greater the impact that tillage has on them. But the larger organisms like earthworms are critical in processing decaying organic matter and they also loosen and aerate the soil with their movements. When you reduce the population of these little guys you are directly impacting how loose, friable and nutrient rich your soil is.
Their is a place for tillage in the garden or farm and should be a tool that you have available. But by keeping in mind what the long term consequences are you may be able to do something to mitigate them. There are options out there like cover crops and mulching which can accomplish many of the same things that tillage does without the same problems.
Stay tuned for more Science of Sustainability topics.
Soil Compaction
Soil compaction occurs when soil is compressed under weight from either a machine or animal. Now some compaction is a natural occurrence and it is remedied by natural methods. But when you introduce tillage into the equation it alters the balance between the soil compacting forces and the soil loosening forces. Now if you have ever seen a garden after it is freshly tilled you will notice that the soil is light, fluffy and very loose. This fluffy top layer however covers up what is happening beneath the tilled layer. When an area is under constant tillage you can loosen the top part of the soil but beneath it will be forming a plow pan layer.
A plow pan is a layer of soil that gets super compacted from being constantly run over by heavy machinery or organisms, but is never loosened because it forms beyond the reach of the tillage equipment. While this layer is beyond the reach of tillage equipment it is not beyond the reach of most roots. Plants put roots down deep in search of water and nutrients and when they hit this layer they can't get through it. This cuts them off from things that they need and this can really hurt plant success.
Loss of Organic Matter
Cultivation is the primary driver behind the loss of soil organic matter. The decay process is hindered in the soil by how much oxygen is available to microorganisms. When the soil is cultivated oxygen floods into the system and stimulates the microorganisms to do what they do and that is break down organic matter. What happens is the rapid consumption of the organic matter which then reduces soil health and also releases CO2 back into the atmosphere. Through continuous cultivation you can destroy even the most fertile of soils and are then forced to supplement the soil with a growing amount of fossil fuels nutrients.
Reduced Populations of Soil Organisms
How would you like it if a tornado, wildfire, earthquake, and a flood all hit your house at the same time. It would ruin your day and that is in essence what we do to soil organisms every time we till the soil. So in a traditional industrial agriculture operation that would be twice a year at the minimum. You can imagine that this might effect how successful certain organisms are at surviving. The larger the organism the greater the impact that tillage has on them. But the larger organisms like earthworms are critical in processing decaying organic matter and they also loosen and aerate the soil with their movements. When you reduce the population of these little guys you are directly impacting how loose, friable and nutrient rich your soil is.
Their is a place for tillage in the garden or farm and should be a tool that you have available. But by keeping in mind what the long term consequences are you may be able to do something to mitigate them. There are options out there like cover crops and mulching which can accomplish many of the same things that tillage does without the same problems.
Stay tuned for more Science of Sustainability topics.
Tuesday, December 16, 2014
Two Documentaries to Inspire You to Change Your Life
Over the years I have read and watched as many sustainable lifestyle books and documentaries as I could in order to find what I could be doing in order to live a more sustainable existence. While I couldn't begin to narrow down my favorite books as there are so many. I do have just two documentaries that I can place among my favorites.

 This documentary follows the life of Colin Beavan as he takes himself, his wife and two year old daughter on a journey to live a no impact life in New York City.
I like this documentary because it starts off as a idea just to live with as minimal impact as possible but it changes into full examination of the modern family and the lifestyle they live.
He and his wife discover by the end of it that living with no electricity and eating only locally grown food while challenging at times comes with its own rewards as well. In my opinion this movie is a must see for those that want to live a no impact life and those that like a good story about a man, a women and a crazy idea.
I will tell you right now though that this film is not primer on how to live a green, sustainable lifestyle. While you do see some of the techniques that Colin uses its more about the inter personal conflicts and overcoming the challenges of trying to do this in a modern day city.

 This particular films follows the exploits of a oddball architect living in New Mexico as he strives to make homes out of garbage. Now it't not as disgusting as it may sound. He successfully builds homes that provide heating, cooling, water filtration, food and comfortable living all off the grid. Each home is built as it's own self supporting entity that can provide for a family.
No Impact Man
I like this documentary because it starts off as a idea just to live with as minimal impact as possible but it changes into full examination of the modern family and the lifestyle they live.
He and his wife discover by the end of it that living with no electricity and eating only locally grown food while challenging at times comes with its own rewards as well. In my opinion this movie is a must see for those that want to live a no impact life and those that like a good story about a man, a women and a crazy idea.
I will tell you right now though that this film is not primer on how to live a green, sustainable lifestyle. While you do see some of the techniques that Colin uses its more about the inter personal conflicts and overcoming the challenges of trying to do this in a modern day city.
Garbage Warrior
Sounds like a great idea but the local building inspectors and State government do not agree. So our architect leaves the comfort of his unique life and goes to the state capitol to try and get permission for him to build these homes. I don't want to ruin the movie for you so I won't say what happens but it is easy to see the brilliance of this man and the validity of the arguments that he makes throughout the movie.
I really love this film for its take on the housing issue that really needs to be addressed in this country. We build housing without regard for climate, sun orientation or environmental cost and that is something that we simply cannot afford to do anymore. If we even took some of the techniques used in the movie to heart we could significantly reduce the impact that our housing has on the planet.
But that's enough from me if you have never see these movies and you have even the smallest interests in protecting the Earth then I think they deserve a viewing.
Monday, December 15, 2014
How To Improve Your Soil Year Round
When it comes to your soil you can usually never do enough to improve your soils ability to provide you with beautiful, nutritious, sustainably grown food. I say usually because it is possible to overdo everything if you really put your mind to it. But with a well thought out plan you can easily and consistently improve and maintain your soil at its peak performance. I find the best way to lay out a soil improvement plan is to do it by the season.
 Assuming you already have your garden layout planned, early spring is a great time for some soil improvement. I would start off with a manure/compost application across the whole garden as soon as I can begin to work the soil. Give that a couple weeks to incorporate fully into the soil as manure can be a little "hot" in both temperature and nutrients when first added to the garden. If you tried seeding directly after a good manure application if could affect seed germination success and cause you to have to replant. After a few weeks have past you can start planting cool season crops like carrots, beets and radishes assuming it's not to early for them.
For gardens where you will be planting transplants or warm season crops like peppers watermelons and tomatoes I would also suggest planting a cool season cover crop that has a legume in it. This not only catches any nutrients that may be lost from the manure but it also adds organic matter to the soil through the roots and mulch that can be created from the tops of the cover crop. Again you will want to terminate the cover crop 2-3 weeks before planting as that will give it time to decompose a little and provide a good bed for seedling transplant.
Spring
 |
| Excellent cover crop mix of rye grain, vetch, fuba bean and red clover |
For gardens where you will be planting transplants or warm season crops like peppers watermelons and tomatoes I would also suggest planting a cool season cover crop that has a legume in it. This not only catches any nutrients that may be lost from the manure but it also adds organic matter to the soil through the roots and mulch that can be created from the tops of the cover crop. Again you will want to terminate the cover crop 2-3 weeks before planting as that will give it time to decompose a little and provide a good bed for seedling transplant.
Summer
Summer is the time when the most activity takes place in the garden. This time is also a great time for soil improvement as you can use a variety of techniques to help your soil out. The number one thing you can do is cover your soil up with a nice layer of mulch. Keeping it covered helps the soil stay moist and constantly supplied by organic matter and nutrients. The organisms that live in the soil will love this constant supply of organic matter and will repay you by releasing nutrients and aerating the soil through their movements. If you feel really ambitions you can interplant a cover crop like clover which can contribute nitrogen to the soil right where you need it
You can also do a top dressing of composted manure which again will add a ready supply of nutrients for your growing plants and will increase the amount of organic matter for next year.
Fall
Fall is the second best time for soil improvements that there is on the calendar. The steps to take are similar to springs with the exception that you don't have a planting time table to worry about. I would again add manure/compost and mulch as needed on the garden. Fall in my opinion is the best time for soil improving cover crops as well. By planting them as early as you take a summer crop off or by even under planting them with the summer crop you maximize the time they have to grow. The key is to get as much growth as possible before you get a hard frost. But they are something that you need to watch closely as well. If you have a long, warm fall they might start to flower and go to seed. This is something you want to prevent because if they are allowed to go to seed they may become weed problems the following spring.Winter
Finally we have winter which after all the tools have been put away and the garden is all in order is the easiest time of year. All you should be doing here is making sure the garden stays covered by a good layer of mulch. By protecting your soil and the organisms that call it home all the work you put into it this year will not be wasted. They will continue to do some good work for you all winter long so it is best to not disturb them any more that you have to. Take this time to plan next years garden and enjoy some well deserved rest as well.Sustainable Transportation- 4 Season Bicycle Riding
I will admit I am a little obsessed when it comes to some aspects of green living. One thing that really annoys me is that people use cars for every little thing that they need to leave their house for. Automobiles are wonderful things that have given mobility and freedom to the poorest among us, but they come at a cost.
The cost of a automobile is not only found in the fuel but also the manufacturing, maintenance, use and final disposal of that vehicle. When you add it all up vehicles are one of the most polluting and environmentally damaging items ever constructed
With that in mind and my desire to live a more sustainable life I try to limit my vehicle use to as little as possible. For example if I want to go to a movie, the library, run a few little errands etc. I will take my bicycle. This saves me money, not only in gas and wear and tear on the car but it also cuts down on wasteful spending because I am only do/buy so much when I am riding a bicycle.
I have a few numbers now that I want to throw at you to help my case on why you should consider riding a bicycle more.
The average annual cost of riding a bicycle is 308 dollars, this would include bicycle maintenance, safety items for you and other misc expenses of a bicycle. Now if we compare that to the average annual cost of owning a car which would be around 8000 dollars a year the difference is clear.
Now there are some things that bicycles are just not practical for and I am well aware of that. If you need to pick up large items or lots of groceries then sometimes you just have to take a car. But I want you to really think about what you do use your car for on a daily basis. You are probably imagining things like going to work, the movies, picking up milk from the grocery store. Well depending on your specific circumstances many of those daily events could be done by bicycle. I bet with some serious consideration quite of few of them could if you really put your mind to it.
Even if you just rode your bicycle to work everyday you could significantly cut down on on your carbon footprint. It would save gas and wear and tear on your car while at the same time improving your health and fitness. For me at least I make it a goal to take my bicycle to work everyday that I feel safe doing it. Sometimes the winter weather gets the best of me and I decide I will feel safer with four wheels under me than two.
So to sum up this whole long confusing post take that bicycle off the wall and put it to use on a daily basis. Once you get into the groove of it you won't regret leaving your car parked at all.
Sunday, December 14, 2014
Science of Sustainability- Maintaining Soil Fertility
For thousands of years soil fertility was maintained using a natural fertilizer widely available around the world.
This fertilizer is known as poop.
That's right I said poop. I know that to the modern sensibilities the idea of using poop to grow food is probably a little uncomfortable. But when you compare it to the the other option we have been using it really doesn't seem that bad.
Soil under modern agriculture has been reduced to a being a sponge that is there is absorb artificial fertilizers and pesticides instead of a living breathing structure. While chemicals can produce a amazing crop with great yields it has been shown that they suffer in flavor and nutrition.
The growing trend of organic farming has brought about a new interest in maintaining soil fertility without the use of chemicals. This can be done with two different but very complimentary techniques.
This can work on the smaller backyard garden scale as well if you have chickens. By allowing them to feed in the garden after all the goodies have been removed they will not only fertilize the soil but will also clean up the garden for you.
The use of cover crops have multiple benefits for someone trying to build a sustainable life. They aid in maintaining soil fertility by reaching down deep into the soil and pulling nutrients up into the soil close to the surface. The nutrients are then trapped in the cover crop vegetation and released when it starts to decay. The other benefit to cover crops is they can work as great feed for animals to graze on which promotes fertility through manure deposits.
Between these two techniques you can indefinitely maintain a healthy, high fertility soil that will grow great food.
Stay tuned for more Science of Sustainability topics
This fertilizer is known as poop.
That's right I said poop. I know that to the modern sensibilities the idea of using poop to grow food is probably a little uncomfortable. But when you compare it to the the other option we have been using it really doesn't seem that bad.
Soil under modern agriculture has been reduced to a being a sponge that is there is absorb artificial fertilizers and pesticides instead of a living breathing structure. While chemicals can produce a amazing crop with great yields it has been shown that they suffer in flavor and nutrition.
The growing trend of organic farming has brought about a new interest in maintaining soil fertility without the use of chemicals. This can be done with two different but very complimentary techniques.
Manure
The first technique is the most obvious one and that is to spread manure onto your garden or fields. Manure is great because it is basically ready to go plant food that can easily incorporated into the soil and placed right at the roots of the plants. Manure can be delivered a couple of ways to where you need it. The common option used by many farmers is to load up manure and use a spreader to fling it all over the fields. While this method is effective it does require frequent trips and a big investment in time and money every year. A better option in my mind is to fence in areas that need fertilizing and then allow animals to graze the crop residue.This can work on the smaller backyard garden scale as well if you have chickens. By allowing them to feed in the garden after all the goodies have been removed they will not only fertilize the soil but will also clean up the garden for you.
Cover Crops
The use of cover crops have multiple benefits for someone trying to build a sustainable life. They aid in maintaining soil fertility by reaching down deep into the soil and pulling nutrients up into the soil close to the surface. The nutrients are then trapped in the cover crop vegetation and released when it starts to decay. The other benefit to cover crops is they can work as great feed for animals to graze on which promotes fertility through manure deposits.Between these two techniques you can indefinitely maintain a healthy, high fertility soil that will grow great food.
Stay tuned for more Science of Sustainability topics
Saturday, December 13, 2014
Wrapping Up Christmas Presents the Green Way
So here we are again at another Christmas season. A season know for its family gatherings, good food and general merriment all around. But it is also a time of tremendous waste as we wrap up all the presents we get people in all sorts of pretty paper, bows and ribbon. The problem with all that nice wrapping paper is that goes right into the trash after it is ripped off the presents.
For those of you like me the thought of spending money on what is essentially a throw away product is difficult. It exemplifies exactly what is wrong with our consumer, materialistic throw it away society.
But people expect to have wrapped presents and like many things during the holiday season
its not optional.
While wrapping presents may not be optional what you wrap them in is. There are lots of options out there for those that are trying to be more green.
This particular tactic really only works you have people like my father opening presents. He very carefully cuts the tape holding the paper and pulls it off in all one piece. But lets face it how many people do you know that do that? There is also the option of recycled wrapping paper which can be purchased online or from stores.
Newspaper
My personal favorite is the use of old newspaper. The paper is nice and soft and easy to fold and tape. It can make some parcels interesting to wrap depending on their size as newspapers come in only a few sizes. I would always challenge myself to find a interesting story that would catch the eye of the person unwrapping it. Plus you can always expect a few "so you used newspaper to wrap your present" comments which make a great launch platform for a green living rant.
The nice thing about newspaper is that once all the tape is peeled from it you can throw it in the compost bin or add it to your garden as mulch.
Please take some time this holiday season to think of the Earth and how you can be a better steward of the land. If we all are more aware of our actions we could make a impact for the betterment of the Earth this holiday season.
For those of you like me the thought of spending money on what is essentially a throw away product is difficult. It exemplifies exactly what is wrong with our consumer, materialistic throw it away society.
But people expect to have wrapped presents and like many things during the holiday season
its not optional.
While wrapping presents may not be optional what you wrap them in is. There are lots of options out there for those that are trying to be more green.
Reuse Something
Old Wrapping PaperThis particular tactic really only works you have people like my father opening presents. He very carefully cuts the tape holding the paper and pulls it off in all one piece. But lets face it how many people do you know that do that? There is also the option of recycled wrapping paper which can be purchased online or from stores.
Newspaper
My personal favorite is the use of old newspaper. The paper is nice and soft and easy to fold and tape. It can make some parcels interesting to wrap depending on their size as newspapers come in only a few sizes. I would always challenge myself to find a interesting story that would catch the eye of the person unwrapping it. Plus you can always expect a few "so you used newspaper to wrap your present" comments which make a great launch platform for a green living rant.
The nice thing about newspaper is that once all the tape is peeled from it you can throw it in the compost bin or add it to your garden as mulch.
Create Something New
If you have kids or your a kid at heart and you want to get into the holiday spirit in a good way wrap the presents in craft paper. By wrapping the presents in a plain brown or white craft paper you can then draw and color them with holiday themes. The wrapping itself would make a great home made present and you can simply burn,recycle or compost the paper afterwords. If you do chose to compost them make sure what was used to color them is biodegradable or otherwise Earth friendly.
Other materials that could be used include fabric from thrift stores, natural materials like bark or leaves or whatever you want I suppose. The options are endless for someone with a little imagination and the Earth is plentiful with natural materials.
Other materials that could be used include fabric from thrift stores, natural materials like bark or leaves or whatever you want I suppose. The options are endless for someone with a little imagination and the Earth is plentiful with natural materials.
Please take some time this holiday season to think of the Earth and how you can be a better steward of the land. If we all are more aware of our actions we could make a impact for the betterment of the Earth this holiday season.
Wednesday, December 10, 2014
Science of Sustainability- How to Increase Soil Organic Matter
Soil organic matter is added to the soil through the addition of decaying plants and animals. But to increase soil organic matter can be a tricky proposition when you are using the soil for gardening or farming. The very tools used to plant, weed and harvest a crop will work against you if your goal is to add organic matter. Organic matter present in the soil is a combination of carbon and nutrients like nitrogen, potassium, magnesium and what ever else might be floating around in living things. The nutrients/minerals are used by all living things as building block for various structures that are contained within them. If you look at silica for example, it is used by plants to,
That brings me right into the heart of what I am here to talk about. When you want to increase the soil organic matter and still have a working farm or garden there are 3 steps you have to follow to do it.
I put this step 1st because it flies in the face of conventional agriculture wisdom. For thousands of years it has been know that you must cultivate and work the soil in order to be able to grow food on it.
Wrong... mostly
Ok a initial working of the soil is usually needed to break up large soil formations and reduce and eliminate competition with your food crop. That is fine and I can agree with that 100% you can't plant a summer squash seed right into your grass and expect it grow. Even if it does sprout the grass will probably out compete it and smother it. Once you are past the initial breakup and loosing of the soil if you expect to maintain soil carbon you can't cultivate it. If you work on developing a healthy soil with lots of organic matter and soil organisms, they will do the cultivation for you. I know that not cultivating the soil will be hard on long time gardeners and farmers but after a few years you won't miss it.
The next step after hanging up your cultivator is to make sure the garden or field stays well covered with compost or mulch at all times. You may have to remove it to plant seeds but as soon as you can put it back. Soil does not like to be naked and by keeping your soil covered and "happy" it will give you healthier and more productive plants. The crop residue/mulch/compost will continuously add carbon and nutrients right to the roots of the new plants.
There are a few classes of plants out there that are known for their ability to add soil carbon and nutrients at impressive rates. By using the right cover crops within your garden or field rotations you can significantly increase soil organic matter. This step is especially crucial because it puts soil carbon right where it needs to be in the soil. As cover crops grow they push roots deep into the soil profile and when they die the roots should be left to decay and deposit the organic matter underground. The more roots you can have in the ground the better off your soil organic matter will be. Plants in the grass and legume families are great cover crops because when used together they add both soil carbon and nitrogen to the soil.
Below you will see a link to one of the many cover crop mixes available on sites like Amazon. I would always recommend using some sort of cover crop as the benefits from using them far outweigh the detractors when used correctly.
By following the 3 steps I have outlined above you will be well on your way to keeping or increasing your soils organic matter.
Stay tuned for more Science of Sustainability topics.
- improve wear tolerance
- improve disease resistance
- better upright growth and rigidity
- increased root density
That brings me right into the heart of what I am here to talk about. When you want to increase the soil organic matter and still have a working farm or garden there are 3 steps you have to follow to do it.
Step 1- Reduce or Eliminate Soil Cultivation
I put this step 1st because it flies in the face of conventional agriculture wisdom. For thousands of years it has been know that you must cultivate and work the soil in order to be able to grow food on it.
Wrong... mostly
Ok a initial working of the soil is usually needed to break up large soil formations and reduce and eliminate competition with your food crop. That is fine and I can agree with that 100% you can't plant a summer squash seed right into your grass and expect it grow. Even if it does sprout the grass will probably out compete it and smother it. Once you are past the initial breakup and loosing of the soil if you expect to maintain soil carbon you can't cultivate it. If you work on developing a healthy soil with lots of organic matter and soil organisms, they will do the cultivation for you. I know that not cultivating the soil will be hard on long time gardeners and farmers but after a few years you won't miss it.
Step 2- Leave all the Crop Residue or Add Mulch/Compost
The next step after hanging up your cultivator is to make sure the garden or field stays well covered with compost or mulch at all times. You may have to remove it to plant seeds but as soon as you can put it back. Soil does not like to be naked and by keeping your soil covered and "happy" it will give you healthier and more productive plants. The crop residue/mulch/compost will continuously add carbon and nutrients right to the roots of the new plants.
Step 3- Plant Cover Crops
There are a few classes of plants out there that are known for their ability to add soil carbon and nutrients at impressive rates. By using the right cover crops within your garden or field rotations you can significantly increase soil organic matter. This step is especially crucial because it puts soil carbon right where it needs to be in the soil. As cover crops grow they push roots deep into the soil profile and when they die the roots should be left to decay and deposit the organic matter underground. The more roots you can have in the ground the better off your soil organic matter will be. Plants in the grass and legume families are great cover crops because when used together they add both soil carbon and nitrogen to the soil.
Below you will see a link to one of the many cover crop mixes available on sites like Amazon. I would always recommend using some sort of cover crop as the benefits from using them far outweigh the detractors when used correctly.
By following the 3 steps I have outlined above you will be well on your way to keeping or increasing your soils organic matter.
Stay tuned for more Science of Sustainability topics.
Sunday, December 7, 2014
Science of Sustainability- Why is Soil Organic Matter Important?
Organic matter is a essential part of soil that gets overlooked in many conversations about soil. While most people will be talking about soil pH balance, its composition or how well it grows crops they will leave out organic matter.
This is a mistake.
Organic matter when you get right down to it is one of the most important parts of the soil when it comes to doing what soil does best and that is grow things. Now when soil is first formed it has no organic matter as it form out of a rocky parent material that has been broken down. But as you get the first hardy inhabitants like lichens they begin the process of adding organic matter to the soil. Time goes by and the lichen give way to grasses, trees and forests as the soil builds up over the millennium. All this organic matter is what makes soil useful to us. Without it, it will be impossible to grow the food we need.
A easy definition of organic matter is any living or dead material that is either incorporated or is on top of the soil. A continuous organic matter supply is critical for soil to function in a sustainable fashion. It has a few key functions that allow for soil to be fertile over the long term,
While I cannot give you exact numbers on how much water since it changes from place to place I can tell you its a lot. The organic matter essentially acts like a giant sponge absorbing and releasing water at a slow place just as the plants need it. If you have a healthy soil with lots of organic matter it can absorb higher amounts of rainfall before the soil becomes saturated. This leads to lower erosion and better yields from crops because the plants have a steady water supply.
This is a mistake.
 |
| Home compost a.k.a organic matter |
A easy definition of organic matter is any living or dead material that is either incorporated or is on top of the soil. A continuous organic matter supply is critical for soil to function in a sustainable fashion. It has a few key functions that allow for soil to be fertile over the long term,
- Acts as a nutrient sink.
- Retains water
- Provides food for soil organisms.
Nutrient Sink
Everything living thing is a storehouse of nutrients/energy that we have borrowed from the Earth and the Sun. When a organism dies the nutrients that are tied up the body get released into the environment to be used by something else. It is the ultimate form of recycling with nothing going to waste. Now as something decomposes it adds decayed organic matter to the soil which are essentially little nuggets of plant available nutrients just waiting to be used again. That's why when you add compost a.k.a decomposed organic matter to a garden the crop you plant there does better than if you hadn't added any. The higher the the percentage of organic matter in the soil the more fertile the soil is.
Retains Water
While I cannot give you exact numbers on how much water since it changes from place to place I can tell you its a lot. The organic matter essentially acts like a giant sponge absorbing and releasing water at a slow place just as the plants need it. If you have a healthy soil with lots of organic matter it can absorb higher amounts of rainfall before the soil becomes saturated. This leads to lower erosion and better yields from crops because the plants have a steady water supply.Food for Soil Organisms
Worms, bacteria and fungi need to eat to, When they eat the dead organic matter they break it down even faster and concentrate the nutrients even more. You may have seen or heard of worm bins which are worm powered composters which can eat up to half their weight in food a day and produce incredible compost. The organic matter is essential food for soil organisms and with enough organic matter you will have a lots of them improving your soil.
So take away points from this is that organic matter is important and maintaining and adding to it should be a goal of any person interested in sustainable/green living.
Stay Tuned for more Science of Sustainability topics
Thursday, December 4, 2014
Science of Sustainability- Preventing Soil Erosion On Your Land
If you wish to build a sustainable homestead then it is critical that you know how to control soil erosion in all its forms. Just a quick recap if you didn't read my last post soil erosion is caused by wind and water moving the soil from one place to another. It will depend on your location and management practices which type of erosion is more devastating to your land.
If you live in high wind and dry areas like the Great Plains of America then wind is your primary concern as it can take exposed soil and carry it off . During the Dust Bowl areas that were hit hard by it lost over 5 inches of topsoil by 1938. When it takes 1000 years to form a inch of soil losing 5 inches can be devastating to local ecosystems and agriculture.
But back to the focus of this post which is preventing soil erosion from happening. The method to prevent soil erosion is a simple idea on paper but can be hard to do in reality.
Soil doesn't like to be naked...
What I mean by that is that if you want your soil to perform at its best in all conditions it needs to be covered by a protective coating of organic matter. It prefers to have living perennial biomass like grasses but it will take whatever it can get. So if you want to prevent soil erosion from both wind and water keep your soil covered with some sort of vegetation.
It works on both because wind and water move in the same way as described by a branch of physics called fluid dynamics. As wind and water hit obstructions on the soil i.e plant matter it slows them down. The slower the movement, the less erosive power the wind or water has. It is relatively easy to keep all your garden beds covered with plants or a mulch layer but when you start dealing with farm size agriculture then it gets trickier. The best thing you can do is minimize tillage of the fields or go no-till and leave as much organic matter on the field as possible.
The nice thing about keeping soil covered is that when it does start to move it will get stopped and dropped back to the soil surface as it runs into plant matter. So technically soil will be moving around on the field but it won't get very far because every direction it goes it runs into something.
But keeping everything covered in plant matter is only part of the battle you also have to plan according to local topography, climate and soil class
You don't want to garden on slopes as they just give water a running start on eroding away your soil. You get one bad rainstorm and you will watch your garden wash away. You can mitigate this issue by building terraces on sloped fields which reduce the steepness of the slope. But if you can avoid exposing soil on slopes I would recommend it.
You soil class is also key to fighting erosion. Some soils are more likely to erode then others and knowing your soil and its erosive potential can save you a lot of headache. To learn more about your soils erosive potential do a texture test on it to figure out what class of soil it is,
Stay tuned for more Science of Sustainability topics
If you live in high wind and dry areas like the Great Plains of America then wind is your primary concern as it can take exposed soil and carry it off . During the Dust Bowl areas that were hit hard by it lost over 5 inches of topsoil by 1938. When it takes 1000 years to form a inch of soil losing 5 inches can be devastating to local ecosystems and agriculture.
But back to the focus of this post which is preventing soil erosion from happening. The method to prevent soil erosion is a simple idea on paper but can be hard to do in reality.
Soil doesn't like to be naked...
 |
| This make look trashy but I'm actually helping my soil. |
It works on both because wind and water move in the same way as described by a branch of physics called fluid dynamics. As wind and water hit obstructions on the soil i.e plant matter it slows them down. The slower the movement, the less erosive power the wind or water has. It is relatively easy to keep all your garden beds covered with plants or a mulch layer but when you start dealing with farm size agriculture then it gets trickier. The best thing you can do is minimize tillage of the fields or go no-till and leave as much organic matter on the field as possible.
The nice thing about keeping soil covered is that when it does start to move it will get stopped and dropped back to the soil surface as it runs into plant matter. So technically soil will be moving around on the field but it won't get very far because every direction it goes it runs into something.
But keeping everything covered in plant matter is only part of the battle you also have to plan according to local topography, climate and soil class
You don't want to garden on slopes as they just give water a running start on eroding away your soil. You get one bad rainstorm and you will watch your garden wash away. You can mitigate this issue by building terraces on sloped fields which reduce the steepness of the slope. But if you can avoid exposing soil on slopes I would recommend it.
You soil class is also key to fighting erosion. Some soils are more likely to erode then others and knowing your soil and its erosive potential can save you a lot of headache. To learn more about your soils erosive potential do a texture test on it to figure out what class of soil it is,
Stay tuned for more Science of Sustainability topics
Saturday, November 29, 2014
Science of Sustainability- How Soil Erosion Happens
Soil erosion is the enemy of anyone who works with soil. It is a constant battle against the elements in a effort to save and improve the precious resource that is soil. The primary erosive forces that occur in nature are wind and water and they effect soil in different and subtle ways.
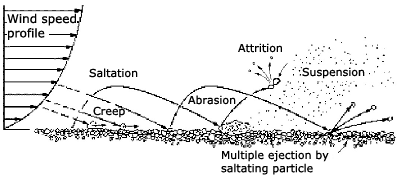

Wind
There are 3 primary ways that wind can erode soil. You have creep which is when particles that are to big to be lifted by the wind are pushed along the ground by it. These particles tend to dislodge other ones and cause further erosion along the winds path.
Then you have saltation which is when particles of soil are briefly suspended into the air but will drop back down to the surface of the ground. The impact of the soil particles as they drop back to the surface causes them to breakdown into smaller particles which can be carried by the wind.
Finally we have suspension which is when particles less then .1 mm in diameter can be carried by the wind long distances. This stage of wind erosion is one of the most visible and awe inspiring forms of it that we can experience. The images from the Dust Bowl are the most visible example of this.
 The amount of erosion that happened during the Dust Bowl is estimated to have damaged over 80% of the High Plains region. By 1938 over 5 inches of topsoil had been lost on 10 million acres and another 2.5 inches was lost on another 13 million acres.
Despite all our efforts to fight soil erosion and all we have learned over the years it is still a issue we deal with today.
Water
Water erosion is a common problem facing farmers, ranchers, roads and anything that is built on soil. There are four types of erosion that occur from water, sheet, rill, gully and splash erosion.
Sheet erosion is when water move across the soil surface in a smooth even layer of water. It is not a very powerful form of erosion and will only remove a thin layer of soil. The caveat to that is the water will remove soil from a large area and that can add up quickly when you have large areas of bare soil cropland.
Rill erosion is the next step up on the water erosion list. You get rill erosion when the even coverage of sheet erosion coalesces into thin streams of water that cut deeper into the soil profile. They can create a spider web effect across a bare crop field that looks like the picture to the right.
Gully erosion is created when rills run together and slope increases which causes the water to dig down into the soil and create a wide, deep channel. There is some confusion sometimes about when it is a rill and when it is a gully. A good rule of thumb to follow is that when you can smooth it out easily then it's a rill if you can't then it's a gully.
Splash erosion occurs during weather events when rain drops impact the soil and can fling soil particles up to 3 feet from the impact point. In the center of a field this is not much of issue but it can cause erosion at the edges.
So now that I have covered the basic ways erosion happens in nature it should give you a better idea how it can happen to you. You have to understand how erosion works so that it can be avoided when you are trying to build a sustainable life. Erosion if not properly planned for can ruin months of work in one bad storm so it is important to know your land and the soils that are on it.
Stay tuned for more Science of Sustainability topics
Monday, November 24, 2014
Science of Sustainability- How Soil is Formed
So in my last few posts I have been covering various topics in soils. From the basic structure of soils to soil pH there is much you need to know about soils in order to successfully manage them in a sustainable fashion. Without soil humans could not exist on this planet at all, it forms the base on which we grow our food, build our homes, and live out our lives. But soil is not something that forms overnight. It takes anywhere from thousands to millions of years to build even one inch of soil so it is not a resource that should be wasted or mismanaged.
There are 5 factors that contribute soil formation that take place in the natural world,
There are 5 factors that contribute soil formation that take place in the natural world,
- Parent Material
- Climate
- Landscape Position
- Living Organisms
- Time
Parent Material
The parent material of a soil is the native rock of any location. The soil will take on the characteristics of the parent material it was formed from. So if you live in a area that has a limestone bedrock the soil that formed on it will be alkaline and may inhibit the growth of certain plants. Knowing what the parent material is beneath your feet can save you a lot of time and effort when it comes to starting a garden.
Climate
The climate and the weather patterns of the location in which a soil forms greatly impact the rate at which soil can form. Through weathering from wind, rain and sun the parent material of a soil will slowly break into smaller and smaller particles until it becomes the sands, silts and clay's that form building blocks of soil. Areas that have lots of rain, softer parent materials and other erosive forces will generate a thick layer of soil much quicker than a areas like the deserts, mountians or the poles.
Landscape
Landscape affects how soils form on a smaller scale. Even with all other factors being the same the soil that is at the bottom of the hill will be different that the soil at the top of the hill. There will be variability in thickness, chemical composition, pH, soil texture, etc.
 |
| The tree growing out of a rock shows this perfectly. |
Living Organisms
Once there is a little soil in place organisms like mosses and lichens can begin to take root. Once they do the roots of the plants speed the process up by cracking and breaking the parent material up further. The cracks allow more water to penetrate into the parent material which allows it erode faster. As more soil forms you get larger and larger plants growing in the soil that forms which accelerates the process yet again.
Time
Time is by far the most important factor in soil formation. When it can take 1000 years under the most favorable conditions to form a inch of soil you need a lot of time to get something useful. If you look at Mollisols or prairie soils they can be 2 ft or more in thickness depending on your location. Even under good conditions that could be 20,000 years to form the soil which is considered the breadbasket of the world. You will also have forces overtime that can actually reset soil formation like floods or glaciers which can scour away all the soil that formed forcing the process to start again.
Sustainable Living
By knowing how soil is formed and perhaps more importantly how long it takes to form it should give you a appreciation for soil and what it is worth. To manage the soil in a sustainable way should be the number one goal of anyone seeking to live a self sufficient lifestyle. Soil is lost at a rate of 10 times the rate of replenishment here in the US. If one of the most advanced and educated countries in the world can't manage our soil correctly then the rest of the world doesn't have much hope. But through good practices and sustainable use we can stop and even reverse soil erosion if we wanted too. But the challenges to do that are great and soil erosion will never stop completely.
Stay tuned for more Science of Sustainability topics.
Friday, November 21, 2014
Science of Sustainability- Jar Test for Soil Compostion
There are many methods and tools out there for figuring out what your soil it made of. They can range from very cheap to omg expensive and unless you have a big bankroll you will want to stay away from a lot of them.
One of the most common things you will want to know about your soil is what is it made of. All soil is made of a combination of sands, silts and clay's in various percentages. What those percentages are is critical for determining a lot of what you do on your land.
There are a few ways you can test to figure out what soil components your soil has. There is the soil texture triangle like I talked about in my last post or you can also use progressively smaller screens to separate the soil into its component parts.
The method I want to talk about today is the jar method. To do this you need a large jar like one of those gallon size pickle jars, a decent sample of your soil and water.
Take your glass jar and fill it about 1/3 full of soil. Make sure the soil you use is a representative sample of the area you are testing. The add enough water to fill the jar about 2/3 full. Shake the jar until all the soil is completely mixed and suspended into the water.
Then leave the jar to sit for at least 24 hours or longer if needed to get clear water at the top of the jar.
Once all the particles of soil have settled to the bottom of the jar you should see clear bands of different soil materials. At the bottom will be the sands then the silts and the clay's will be on top of that. By measuring how thick the bands of soil are then comparing that to the total thickness of the soil you can get a rough percentage of the soil composition.
This test can be more accurate for a novice to perform than the texture triangle as you can use simple measurements and little math to get a accurate reading.
Stay tuned for more Science of Sustainability topics
Thursday, November 20, 2014
Science of Sustainability- Soil Texture Triangle
When building a new sustainable lifestyle you will need to become well versed in topics you have never given a thought about before. One of those topics you will never know everything about even if you study it for years is soil. Soil when you dig into it (pardon the pun) is one of the most fascinating and challenging aspects of building a sustainable, environmentally friendly life. It effects the most basic parts of living, your food, water and shelter needs are directly tied to and influenced by soil.
Soil determines what food you can grow and how much of it you can grow. It will be a large factor in determining where groundwater is and how tasty that water is. It also tells you where you should and should not build a house or other structures.
So to sum up what could be a long rant, you need to know about soil in general and about the soil where you want to build a new life.
Now their are lots of tools out there to help you with figuring out your soil and what it is good for. One of those tool that I want to talk about today is called a soil texture triangle. A soil texture triangle is basically a chart the enables you to figure out what class of soil you have. By measuring the amount of sands, silts and clay contained in a soil you will get a soil class which can tell you a lot about what you can do with that soil.

Clay soils with be sticky and maybe a little slippery but you will mainly notice it sticking to you and itself really well.
Silt soil with have a smooth slippery feel that won't stick like clay does.
Sands of course will be gritty feeling and you can maybe even see individual particles of sand in the soil you are testing.
Once you get a feel for what's in the soil you can consult a texture chart like the one above to help you figure out what you have. It's fairly easy but it does take experience to really get good at it. Some common mistakes people make are mistaking silt for clay and overestimating the clay in the soil. Another common mistake is overestimating the sand. This happens because sand is so easy to notice in the soil It's also easy to underestimate the clay as a little clay goes along way.
Doing a texturing test like this can provide a novice soil scientist with some broad ideas about the soil on their land. For example if you are in a low spot and you find high clay in a texture test that would not be a good place to build a house as water will collect and pool there.
If you want a step by step guide to soil texturing, you can check out this flowchart put out by the US Department of Agriculture.

Soil determines what food you can grow and how much of it you can grow. It will be a large factor in determining where groundwater is and how tasty that water is. It also tells you where you should and should not build a house or other structures.
So to sum up what could be a long rant, you need to know about soil in general and about the soil where you want to build a new life.
Now their are lots of tools out there to help you with figuring out your soil and what it is good for. One of those tool that I want to talk about today is called a soil texture triangle. A soil texture triangle is basically a chart the enables you to figure out what class of soil you have. By measuring the amount of sands, silts and clay contained in a soil you will get a soil class which can tell you a lot about what you can do with that soil.
Basic Method
The basic technique to using a texture triangle is to take a small amount of soil and get it a little wet so it is pliable and sticky. Then just roll and squeeze that bit of soil around in your fingers and palm. Paying close attention as you play with the soil you will start to notice a few key characteristics.Clay soils with be sticky and maybe a little slippery but you will mainly notice it sticking to you and itself really well.
Silt soil with have a smooth slippery feel that won't stick like clay does.
Sands of course will be gritty feeling and you can maybe even see individual particles of sand in the soil you are testing.
Once you get a feel for what's in the soil you can consult a texture chart like the one above to help you figure out what you have. It's fairly easy but it does take experience to really get good at it. Some common mistakes people make are mistaking silt for clay and overestimating the clay in the soil. Another common mistake is overestimating the sand. This happens because sand is so easy to notice in the soil It's also easy to underestimate the clay as a little clay goes along way.
Doing a texturing test like this can provide a novice soil scientist with some broad ideas about the soil on their land. For example if you are in a low spot and you find high clay in a texture test that would not be a good place to build a house as water will collect and pool there.
If you want a step by step guide to soil texturing, you can check out this flowchart put out by the US Department of Agriculture.
One you have mastered using a texture triangle you can use the knowledge you gain to better site houses, gardens and that new backyard pool using soil as your guide. Being able to do this will take you one step farther down the path of true sustainable living.
Stay tuned for more Science of Sustainability topics.
Sunday, November 9, 2014
Storing Carrots in the Garden
When you grow a large crop of carrots you can end up with a problem like I have. You can't possible keep all the carrots you grew in the fridge and you don't have a root cellar where you can store them either.
What does that leave you?
 Well luckily most carrots store very well right in the soil of your garden. They do need some protection in order to survive the coldest temperatures of the winter and if you live in a exceptionally cold climate this still might not work for you.
The key with mulching carrots in the ground is to cover them in a thick layer of mulching materials. The more you can pile on the better as it will only increase the insulating value of the mulch. The best varieties of mulch for this are usually some sort of straw as they have the ability to remain light and airy and not get compacted by water and rot. If you do not have straw then other mulch types like leaves, pine needles and other lawn trimmings should suffice.
Before you mulch make sure you know where your carrots are so you don't have to waste time out in the cold digging around for them. Then mulch them late in the fall right before you start to get consistent cold temperatures.
One of the unexpected delights about leaving your carrots in the ground is that as they are exposed to cold temperatures the carrot begins to transform its starch into sugar. What this gives you is a naturally sweet carrot which is a real delight in the middle of winter.
So if by some miracle you have still have carrots in the ground try mulching them over and see what kind of sweet delights the garden can provide all winter.
What does that leave you?
The key with mulching carrots in the ground is to cover them in a thick layer of mulching materials. The more you can pile on the better as it will only increase the insulating value of the mulch. The best varieties of mulch for this are usually some sort of straw as they have the ability to remain light and airy and not get compacted by water and rot. If you do not have straw then other mulch types like leaves, pine needles and other lawn trimmings should suffice.
Before you mulch make sure you know where your carrots are so you don't have to waste time out in the cold digging around for them. Then mulch them late in the fall right before you start to get consistent cold temperatures.
One of the unexpected delights about leaving your carrots in the ground is that as they are exposed to cold temperatures the carrot begins to transform its starch into sugar. What this gives you is a naturally sweet carrot which is a real delight in the middle of winter.
So if by some miracle you have still have carrots in the ground try mulching them over and see what kind of sweet delights the garden can provide all winter.
Friday, November 7, 2014
Science of Sustainability-Soil pH
Soil pH is a critical aspect of soil that must be understood and managed correctly if you want to be able to create and manage a successful sustainable life. What pH your soil is determines a lot about what you can grow and where you can grow it as soil pH can very from plot to plot.
Planning your garden spaces out according to pH will save a lot of headache and expense in the long run. If you have to continually put additives into the soil like lime to counteract acidity then perhaps you need to relocate the garden or grow something else there.
 Measuring soil pH is a really easy and cheap thing to do with today's technology. You can either do it with a meter like this one or with disposable litmus strips. A meter like this will give you a more accurate and precise readings than the litmus and they also last quite a long time if taken care of properly. A meter like this will be useful if you have a large amount of ground to test or if you are consistently making adjustments to your soils pH.

 If you want you can also use litmus papers which when soaked in a solution of soil and water change color to indicate a general level of pH. They are cheaper than the meter but they are one time use only and you will have to replace them once you run out of papers.

Keep on joining me as I continue to delve into further topics on the Science of Sustainability. If you ever have and questions about what I post just let me know in the comments and I will get back to you.
What is soil pH?
The easiest way I could think of to define pH is as follows,
p-means power as in 2 to the 10th power = 1024
H- stands for Hydrogen
So pH together stands for the power of Hydrogen ie. how many Hydrogen ions are present in the material you are measuring.
The higher the amount of Hydrogen ions that are present, the lower the pH will be. This means that when you have a lot of Hydrogen present, the soil will be more acidic. The less hydrogen ions you have the more basic/alkalie the material will be.
The pH scale is what is called a negative logarithmic scale so it increases from 0 which is the most acidic and has the most Hydrogen ions present to the most alkaline or basic at 14. Each step from 0-1 all the way from 13-14 is higher that the previous number by a factor of ten.
For example the most acidic thing on the pH scale would have a pH of 1 while the most alkali or basic material would have a pH of 100,000,000,000,000 if expressed as full numbers rather than on
the scale.
the scale.
 |
| http://bouman.chem.georgetown.edu/S02/lect14/ph.gif |
Soil pH and a Sustainable Life
What I want to really get into now is how knowing about pH is part of building a sustainable lifestyle. The primary way that pH affects you when you are trying to build a sustainable life is how it affects your ability to grow food. Certain crops and plants work better with certain levels of pH. For example strawberries a common garden favorite like a pH between 5.5-6.5. While other favorites like spinach and asparagus like a soil between 6.5-7.5. So they they wouldn't make the best garden bed fellows. The pH of your soil is a critical factor in telling you what can be successfully grown at your location. Now you may still be able to grow things that are outside their preferred pH range but your success could be questionable.Planning your garden spaces out according to pH will save a lot of headache and expense in the long run. If you have to continually put additives into the soil like lime to counteract acidity then perhaps you need to relocate the garden or grow something else there.
Measuring soil pH is a really easy and cheap thing to do with today's technology. You can either do it with a meter like this one or with disposable litmus strips. A meter like this will give you a more accurate and precise readings than the litmus and they also last quite a long time if taken care of properly. A meter like this will be useful if you have a large amount of ground to test or if you are consistently making adjustments to your soils pH. If you want you can also use litmus papers which when soaked in a solution of soil and water change color to indicate a general level of pH. They are cheaper than the meter but they are one time use only and you will have to replace them once you run out of papers.Keep on joining me as I continue to delve into further topics on the Science of Sustainability. If you ever have and questions about what I post just let me know in the comments and I will get back to you.
Tuesday, November 4, 2014
Science of Sustainability- What is Soil
To kick off my new series the Science of Sustainability I have decided to start with a topic that is near and dear to me.
The Soil.
Soil is not dirt, I just want to make that clear right from the the start. Dirt is what happens when soil is no longer doing what it is suppose to do. Soil can be defined as a mixture of minerals, organic matter, water and air that together form a matrix that supports life. Without a decent soil, building a truly sustainable life for yourself is impossible. If you can't grow food, support livestock and otherwise sustainable use the soil you will have nothing that can provide you the basics of what you need. To truly understand soil you have to understand its components and how they work together to create this life giving substance.
Also check out this great article on Treehugger that shows how modern farmers and ranchers are getting on the sustainability bandwagon and doing what they can to improve and save their failing soils.
The Soil.
Soil is not dirt, I just want to make that clear right from the the start. Dirt is what happens when soil is no longer doing what it is suppose to do. Soil can be defined as a mixture of minerals, organic matter, water and air that together form a matrix that supports life. Without a decent soil, building a truly sustainable life for yourself is impossible. If you can't grow food, support livestock and otherwise sustainable use the soil you will have nothing that can provide you the basics of what you need. To truly understand soil you have to understand its components and how they work together to create this life giving substance.
Minerals
Soil is made up of three different sizes of materials. You have sand, silt and clay with sand being the largest and clay being the smallest. The different combinations and proportions of these materials are what make up the soil texture. Soil texture along with soil structure determines how well your soil drains water, soaks up rain, stands up to erosion, and deals with compression forces etc. The minerals in a soil are derived from the parent material that lies beneath all soils. That parent material can be limestone, sandstone, granite, volcanic ash, pretty much anything that can be eroded into smaller and smaller particles.
Organic Matter
The organic matter in a soil is a combination of both living and dead material. It is everything from the smallest microbe to the largest tree roots that are in the soil. Organic matter plays a critical part in having a healthy, sustainable soil. It provides the food and fuel for microorganisms, so that they can enrich the soil and make nutrients available for the next generation of plants. Organic matter also plays a critical role in maintaining water levels in the soil. It acts like a giant sponge that soaks in water and releases it slowly as plants need it.
This video from the Soil Science Society of America tells a bit more about soil and whats its microbes can do for us.
Air and Water
Though most people wouldn't consider water and air to be critical parts of soil they are. If you have adequate pore space which is what holds the air and water then that signifies that you have a healthy, well aggregated soil that allows for good root penetration and water infiltration. Plus the roots of plant need both air and water to sustain life in the plant. Like most things in life everything in moderation is best.Soil and the Sustainable Life
Without healthy well managed soils the future of life and human civilization on this planet is in doubt. With well managed soils we can continue to thrive and grow as a species. But it takes more than just good intentions, we have to know what to do in order to better manage our lands. Stay tuned as I continue my Science of Sustainability series with more information about soil and good soil management.Also check out this great article on Treehugger that shows how modern farmers and ranchers are getting on the sustainability bandwagon and doing what they can to improve and save their failing soils.
Monday, November 3, 2014
The Science of Sustainiblity
To be able to really make a sustainable life work you have to be able to understand the fundamental principles that make it possible. There are so many things that go into creating a sustainable and environmentally friendly life that it is impossible to keep everything you might need to know in your head.
That is where books, articles, websites and blogs come into play. With all the resources at our disposal to collect and compile knowledge we can like never before build our own personal libraries. Now knowledge is no longer the privilege of a chosen few but is available to everyone who can read and comprehend.
So to build a modern, sustainable life you have to become a scientist capable of understanding the basic underpinnings of what a sustainable life is.
You will need to learn what will provide you with the basics of food, water, and shelter. But you will also want to go beyond that and provide the comforts of hot water, electricity and maybe a computer for yourself and your family.
To do that you will need to learn things about raising animals, growing crops, capturing and purifying water and living a life that you have never given a thought to before. Its a daunting task that I am doing myself and I try to share my successes and my failures with the world. I have learned much along the way through trial and error, experiments and careful research but I have much yet to learn.
What I have found useful over the years was my drive to understand the basic fundamentals of how things work. It pushed me to learn how soil works on a physical, chemical and biological level. How the delicate balance of nitrogen to carbon can fuel microbes into breaking down compost in a month. By understanding the basics I could apply the techniques right away without tedious failed experiments.
To make that method available to you I am planing on writing a series of posts on what I will call the Science of Sustainability. They will cover broad topics of soil, plants, energy, water, and other aspects of sustainability. They will provide a basic framework of understanding of how things work so that you can easily begin to build a sustainable life.
The posts will be placed simultaneously here and in my Sustainable Living How To Guides section of the blog.
Sunday, October 19, 2014
Final Harvest of the Year

When pulling in the last of the fall produce you are confronted with the sudden problem of what to do with the sudden bounty at your disposal. Most fall produce is of a very hearty variety like winter squashes, pumpkins, carrots and other cold season crops that can be stored without canning or freezing.
Each type of produce has its own special type of storage you can use.
Pumpkins and winter squash should be stored in a root cellar type structure and maintained at 50-55 degrees and with a humidity of 50-70 %. This is only after curing the pumpkins for 10 days in 80 degree heat and 80%+ humidity. The curing process toughing the rind of the pumpkins and heals small cuts or nicks that could let air and bacteria into the pumpkin.
Carrots can be left in the garden soil if they are properly insulated with leaves, straw or sometimes a cold frame. If you don't want to leave them in the garden instead place them in the root cellar in a bucket or container filled with sawdust or sand. By keeping the sand moist the carrots with retain moisture and flavor well into the winter season.

After I removed the last of the produce most of the tops of the plants went into my compost bins to reclaim the organic matter with the exception of my pumpkins and zucchini as they were suffering from a powdery mildew infection. After I pulled all the tops I spread out the wood chip mulch I used in some spots over the whole garden. Since this picture was taken I have also added a layer of straw on top of the wood chips as additional mulch to protect and enhance my garden soil.
To read more about what I do to prepare my garden for fall check out 3 Ways To Improve Your Garden This Fall
Tuesday, October 7, 2014
Fall Cover Crop Update
 |
| Field Pea Flower Head |
I chose to try two different methods of killing the oats and peas, you can either dig up and cultivate them into the soil which is a effective method. It has its plus and minuses however, on the positive side it is simple and you only need a shovel and a little muscle to accomplish it. On the negative it is work that requires a good shovel and a strong back so is not for everyone.
There is also the roller crimping method which is a cover crop killing method that is all the rage with organic farmers. It basically involves dragging a large cylinder covered with rows of dull teeth on it that presses the stalks of your cover crop into the ground. At the same time it is rolling them flat the teeth are pinching the stalks all the way up the plant. This basically closes up the plants stem preventing it from moving water and nutrients up and down the stem.
|
| Using a brick for roller crimping. |
For more info about roller crimping check out this article
Saturday, October 4, 2014
Extending the Growing Season Using Hoop Houses and Cold Frames
I will just say right from the start that using plastic sheeting and PVC tubing to create hoop houses and cold frames does fly in the face of my environmentalist stance. But as much as I would love to use glass, wood frames and other long lasting and recyclable materials the money isn't available for those materials. PVC pipe and plastic sheeting is cheaper in the short term and as I am not yet building my own modern homestead I do have to keep a few considerations in mind.
 I built both a low tunnel or hoop house and a large cold frame to protect some very late planted tomatoes and Moon and Stars Watermelon. I am hoping that the extra time under the protection of the hoop house and cold frame with give these plants the time they need to actually produce something.
Since I had wooden garden beds already in place making the hoop house was a easy thing to do.
Materials
Tools Needed
 * Step four is more challenging thank it may seem at first glance. First if all you have a large sheet of plastic and if there is any wind you can forget about placing it on that day. Second how does one attach plastic sheeting to to smooth PVC pipes. I used a conglomeration of duct tape and zip ties to attach my side flaps of plastic to the hoop frames. Then using four squeeze clamps, duct tape and more zip ties I attach the top layer of plastic while leaving a front flap removable for ventilation.

- My lack of space in the yard
- The fact that I live in a rental
- That I am low income
These factors constrict me from doing exactly what I want to so instead I find little cheaters to help me along the way.
I have always been interested in using season extension techniques and my garden this year has finally given me the opportunity to try a couple methods out.
I built both a low tunnel or hoop house and a large cold frame to protect some very late planted tomatoes and Moon and Stars Watermelon. I am hoping that the extra time under the protection of the hoop house and cold frame with give these plants the time they need to actually produce something. Since I had wooden garden beds already in place making the hoop house was a easy thing to do.
Materials
- 10 foot 1/2 inch PVC pipe
- 3/4- 2 hole straps
- Plastic sheeting
- Zip Ties
Tools Needed
- Screwdriver
- Duct tape
- Hacksaw
- Marker
- Tape Measure
Getting Started
My hoops are designed with a 3 foot garden bed in mind so the length of the PVC pipe will be variable depending on your situation.
- To get started first take four the the 3/4 inch 2 hole straps and screw them into the walls on the interior of the the garden bed at 4 foot intervals.
- Take your 10 foot PVC pipes and measure, mark and cut them at 90 inches in length
- Insert pipes into the 2 hole straps and bend them till you have both ends secured inside a strap. Repeat steps 3 and four until all hoops are cut and placed.
- Attach the plastic sheeting*
* Step four is more challenging thank it may seem at first glance. First if all you have a large sheet of plastic and if there is any wind you can forget about placing it on that day. Second how does one attach plastic sheeting to to smooth PVC pipes. I used a conglomeration of duct tape and zip ties to attach my side flaps of plastic to the hoop frames. Then using four squeeze clamps, duct tape and more zip ties I attach the top layer of plastic while leaving a front flap removable for ventilation.
I will be adding a more detailed step by step guide on building a hoop house in my Sustainable Living How to Guide section of my blog.
Wednesday, September 3, 2014
Another Step in Green Cleaning
 Slowly but surely over the years I have been transitioning away from chemical cleaners and bathroom items in my quest to become more environmentally friendly. To date I have transitioned to using only castile soaps in the shower like Dr Bronner's or Dr Woods.
  I have since moved onto to a different type of laundry detergent by a company called Norwex called Ultra Power Plus. While it is a effective laundry detergent it is expensive like Ecos and as such is hard for me to justify as a frugal environmentalist.
Now that the Norwex detergent is running out I am coming to the point where I need to either find a replacement or make my own. In the spirit of being self sufficient and frugal I decided to make my own using borax, washing soda, and castile soap.
Laundry Detergent-Liquid
- 1 Bar Soap (I use this castile soap)
- 1 cup Washing Soda
- 1 cup Borax
- Hot Water
- Measuring Cup
- Cheese Grater
- 5 Gallon Bucket
- Big Metal Cooking Pot
- Long Wooden Spoon
- Optional: 35-40 drops of essential oil (tea tree, lavender etc…) I chose tea tree oil.
 |
| Must Have Laundry Ingredients |
Step One: Grate your soap with a cheese grater. This is probably the most work you will do in the entire process. But afterwards your cheese grater will be really clean!
Step Two: Bring big pot of water (about half full) to a boil, and then slowly stir in your grated soap.
Step Three: Once the soap is melted, reduce heat and slowly add in the Washing Soda while stirring with the wooden spoon. At this point a small reaction will occur, and your mixture will try to bubble over a little in your pot. This is where the wooden spoon comes in handy. Lay the wooden spoon across your pot, and then your mixture won’t boil over and make a mess.
Step Four: Add in your Borax to the pot while stirring. Once everything is blended and melted, remove from heat.
Step Five: Fill your five gallon bucket half-way with hot water. Add your soap mixture from the pot to your bucket of water.
Step Six: At this point you can add in your optional essential oil, and stir the mixture really well with your wooden spoon.
Step Seven: Once everything is well-blended, fill the bucket the rest of the way with water and then put the lid on. Allow to cool and sit overnight.
 |
| Finished Product |
Subscribe to:
Posts (Atom)